Thursday, February 13, 2020

Instant Pot Chicken Pot Pie

This recipe is adapted from a slow-cooker one in Healthy Slow Cooker Revolution by America's Test Kitchen. I love the taste of the slow-cooker version, but (like many chicken recipes for the slow-cooker), it has a cook time of about 4 hours. But I'm rarely home in the afternoon to start the crock-pot! I need my slow-cooker recipes to go for 8 hours so I can start them before I leave in the morning. Instant Pot to the rescue! For my Instant Pot version, I swapped chicken thighs for breasts, replaced cream with ordinary milk, and waited to add the flour until after pressure cooking.

Ingredients

Stew:
2 Tbsp unsalted butter
8 oz cremini mushrooms, trimmed and sliced thin
4 carrots, peeled, halved lengthwise, & cut 1/4 inch thick
1 onion, chopped fine
2 Tbsp tomato paste
1 tsp minced fresh thyme (or 1/4 tsp dried)
2 C chicken broth, plus extra as needed
1 Tbsp low-sodium soy sauce
salt and pepper
4-5 bone-in chicken thighs, skins removed, trimmed of excess fat
1 C frozen peas
1/2 C milk
1/3 C flour

Topping:
1 3/4 C flour
1 oz Parmesan cheese, grated fine (1/2 C)
1 1/2 tsp baking powder
1/2 tsp baking soda
4 Tbsp unsalted butter, melted
2/3 C buttermilk

Directions

Preheat the oven to 450°.

Make the stew:
On the sauté setting, melt 2 Tbsp butter. Add mushrooms, carrots, and onions and cook until softened and lightly browned, about 8 minutes. Stir in tomato paste and thyme and cook until fragrant and a fond starts to form on the bottom of the pot, about 2 minutes. Slowly stir in broth, soy sauce, and 1/2 tsp salt, scraping up browned bits. Season chicken with salt and pepper and nestle into liquid. Close and seal the lid, and cook on high pressure for 10 minutes, followed by a 10 minute natural pressure release.

Meanwhile, make the crumble topping:
Line a baking sheet with parchment paper. Whisk flour, Parmesan, baking powder, baking soda, 1/4 tsp salt, and 1/2 tsp pepper together. In a separate bowl, whisk buttermilk and melted butter together. Add buttermilk mixture to flour mixture and gently stir until just combined and no pockets of dry flour remain. Do not over-mix. Crumble mixture into irregularly shaped pieces ranging from 1/2 to 3/4 inch and spread evenly on parchment-lined baking pan. Bake until fragrant and golden brown, about 15 minutes, rotating sheet halfway through. Let cool on baking sheet.

Finish the stew:
After 10 minutes of natural pressure release, turn the valve to venting and allow any remaining pressure to escape, then open the lid. Remove the chicken pieces to a plate and let cool slightly. Meanwhile, stir the flour into the milk, then stir this mixture into the liquid in the pot. Use the lowest sauté setting to bring the pot back to a gentle simmer, stirring frequently until smooth and thickened. Stir in the peas, turn off the pot, and let the residual heat gently cook the peas. Shred the chicken into bite-sized pieces with two forks and discard the bones. Stir shredded chicken back into the pot. Adjust consistency of stew with hot broth if needed, and season to taste with salt and pepper.

Serve in bowls, topped with crumble topping.

Makes 4 to 6 servings,  total time about 40 minutes


Friday, September 01, 2017

Shrimp Pasta with Bacon, Rosemary, & Tomatoes

Delicious bacon-y, garlicky, shrimp pasta
This recipe started with a Saveur recipe for Shrimp with Pancetta and Rosemary. I didn't have pancetta, but I had bacon. I didn't have a whole tomato, but I had half a container of grape tomatoes slightly past their prime. And I wanted pasta to make it more of a whole entree. Actually, I pretty much always want pasta.

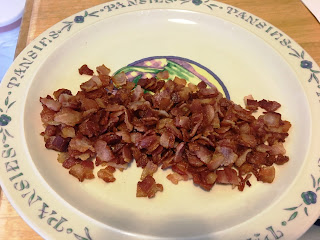
Start by cooking up 8oz of diced bacon in a skillet until it's nice and crispy:


Like this:

Take the bacon out of the pan, and discard all but about a tablespoon of the bacon fat. Add about two tablespoons of olive oil, heat the pan back up, and throw in four cloves of minced garlic. Let that garlic juuuust start to turn golden, no more than this:

Season some peeled, deviened, cut-in-half medium shrimp with salt and pepper, and toss them with the garlic until they turn pink all over:

Add some grape tomotoes, cut in halves or quarters (depending on how big they are), a half-cup of white wine, and some minced fresh rosemary if you've got it- or dried rosemary if you don't. It'll look like way too much liquid:

But after about 2-3 minutes it cooks down into a nice sauce, so add some cooked pasta:

And that bacon you started with:

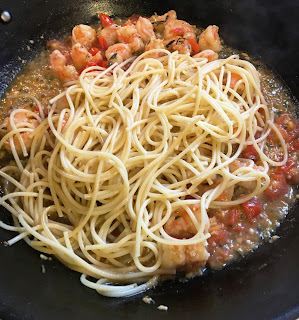
And toss it all together:

Don't forget Parmesan cheese over top!


Ingredients

1/4 pound dry spaghetti (or other long pasta)
8oz bacon, diced
2 Tbsp olive oil, plus 1 tsp
4 cloves garlic, minced
18 medium shrimp, peeled & de-veined & cut in half (or 36 tiny shrimp, whole)
salt & pepper to taste
1 1/2 tsp minced fresh rosemary (or 3/4 tsp dried crushed rosemary)
1 C grape tomatoes, quartered
1/2 C white wine
grated Parmesan cheese, for topping

Directions

Cook the dry pasta according to package directions, drain, & toss w/ 1 tsp olive oil. Return to pot to keep warm while you make the shrimp to go with it.

Saute the bacon in a 12-inch skillet until crisp and the fat has rendered. Remove the bacon to paper-towel-lined plate. Discard all but 1 Tbsp of the bacon fat; add 2 Tbsp olive oil to the remaining bacon fat & return the skillet to medium heat. Add the garlic & stir constantly until garlic softens and begins to turn slightly golden- don't overcook it or the garlic will turn bitter! Season the shrimp with the salt and pepper and add them to the skillet. Cook about 2 minutes, until the shrimp turn pink all over. Add the rosemary, tomatoes, & wine and cook 2-3 more minutes until the liquid reduces by about half. Add the cooked pasta and bacon to the skillet and toss to combine. Sprinkle generously with Parmesan cheese to serve.

Tuesday, November 03, 2015

Triple Chocolate Spice Cookies

This recipe started as ordinary chocolate-chip cookies and evolved over time. First I added the cinnamon because I like cinnamon with chocolate. Later V inspired me to try cardamom, and one night I needed a bigger chocolate fix and added some cocoa powder to the dry ingredients. Many iterations later, we have this:

Ingredients

1 1/8 C all-purpose flour
1/8 C cocoa powder
1/2 tsp baking soda
1/2 tsp salt
1/2 tsp ground cinnamon
1/2 tsp ground cardamom
1/8 tsp chili powder
1/4 C unsalted butter, softened
1/4 C vegetable shortening
3/8 C granulated sugar
3/8 C brown sugar, firmly packed
1 egg
1/4 C semisweet chocolate chips, melted
1/2 tsp vanilla extract
1/4 tsp butter flavor extract (optional)
1 C semisweet chocolate chips, NOT melted

Directions

Preheat oven to 350 & position racks close to the center.
In a small bowl, combine the flour, cocoa powder, baking soda, salt, and spices.
In another bowl, cream together the butter, shortening, sugar, and brown sugar. Blend in the egg, melted chocolate, vanilla, and butter flavor. Add the dry ingredients and stir to combine well. Stir in the chocolate chips.
Drop by rounded tablespoons onto a cookie sheet lined with parchment paper or nonstick foil. Bake at 350 for 8-10 minutes, depending on how soft-&-gooey or well-done you like your cookies. Remove from oven and let stand on the tray long enough to firm up for handling, then remove to a cooling rack or directly into your mouth. I won't judge.
Makes about 2 dozen cookies, depending on how much dough you eat straight out of the bowl.

Friday, February 08, 2013

Falafel + Waffle = Fa-wafel!

Falafel are tasty, protien-packed treats made of ground chick-peas and spices that can be a snack, an appetizer, or even (in sufficient quantity) a meal. They are common to in Middle-Eastern cuisines and are usually deep-fried. I've baked them before for a less-greasy option. Then, last night, I wondered this: what if I made falafel batter and cooked it in my waffle iron? Here is the answer: It works. It works really well! My friends, I give you the Fa-Wafel!

This recipe is (slightly) adapted from the falafel batter found on Bob's Red Mill's website (http://www.bobsredmill.com/recipes_detail.php?rid=1611)

Mix together these dry ingredients:

2 cup chickpea or garbanzo bean flour (sometimes labelled "besan" in Asian markets)
1 tsp salt
1/2 tsp baking soda
2 tsp Parsley Flakes (optional)
1 tsp Cumin, ground
1/2 tsp Coriander, ground
1 tsp Garlic Granules
1/2 tsp Onion Powder

Then stir in:
4tsp Lemon Juice
1 1/4 cup HOT Water
2 Tb Olive Oil 

Let the batter stand for 10 minutes. Near the end of the waiting time, heat up your waffle iron to its hottest setting. When all is ready, liberally spray your waffle iron with cooking spray- olive oil flavor if you've got it! Measure out the recommended amount of batter for your waffle iron and cook for the same time you would usually cook a waffle- it should come out lightly golden and very fragrant!

This amount of batter made 4 6-inch round waffles in my "deep-grid" waffle iron. Your results will vary with the size of your iron!

Serve with your choice of dippers- tahini sauce, chutney... whatever seems good! Enjoy your tasty and protein-packed treat. And enjoy NOT cleaning up a messy frying pan and splatters of oil!


Tuesday, October 18, 2011

Pizza Puffs

I got the idea for these pizza puffs from Cooking With My Kid, where a broccoli version was featured for Meatless Monday. I wasn't feeling the all-veggie vibe, so I made mine with turkey sausage, spinach, and a little bit of pepperoni for zing. I felt pretty virtuous- the whole wheat, spinach, and turkey sausage seem pretty healthy to me!
These yummy puffs seem pretty versatile- I think you could change the kind of cheese and swap out a wide range of fillings. Just keep the basic proportions the same- 3/4 C Cheese and 1 1/2 C total fillings. I think next I'll try breakfast-y ones with sausage, mushrooms, and cheddar.

Ingredients:
3/4 C whole wheat flour
3/4 tsp baking soda
1/2 tsp garlic powder
1 tsp Italian seasoning
3/4 C milk
1 egg, beaten
3/4 C mozzarella cheese
3/4 C frozen chopped spinach, thawed under running water and squeezed mostly dry
1/2 C cooked Italian turkey sausage, diced
1/4 C pepperoni, diced

Steps:
  1. Prepare your ingredients: shred the cheese, dice the sausage & pepperoni, and thaw and squeeze dry the spinach.
  2. Preheat the oven to 375, and grease a set of 24 mini-muffin tins.
  3. Whisk together the flour, baking powder, garlic powder, and Italian Seasoning.
  4. In a small bowl, lightly beat the egg. Beat in the milk.
  5. Whisk the milk mixture into the dry mixture.
  6. Stir in the cheese, spinach, sausage, and pepperoni.
  7. Allow the batter to sit for 10 minutes.
  8. Quickly stir the batter once more, then scoop evenly into the greased mini-muffin tins.
  9. Bake at 375 until slightly puffed and golden.
Serve warm, with pizza sauce for dipping. Leftovers keep well in the fridge, freeze well, and reheat nicely in the microwave or toaster oven.

Saturday, July 23, 2011

How NOT to Make Chinese Pork Buns

This post is for those among my friends, like Mindy & Amanda, who have such faith in my cooking skills that they routinely declare, "anything you make is delicious!" I do in fact have kitchen failures, and sometimes they are pretty spectacularly bad.

I love me some Chinese barbecue pork buns, and I buy a package of frozen ones every time I get to visit the mega-Asian-mart grocery store near my friend V's house. But there's no local source, so recently I Googled up a few recipes. The recipes I'd found called for marinating the pork, then oven-roasting it, the shredding it and using it as the base for the bun filling. "Bah!" I thought. "I make pulled-pork barbecue in the slow cooker all the time. I'll just do that." So I started gathering the ingredients for the marinade and putting them in the slow-cooker crock. And right about this time my kitchen was invaded by several friends who had come over to play in the swimming pool and brought dinner with them. Suddenly the kitchen was crowded and full of commotion and all the utensils and measuring spoons were in short supply. Whatever- barbecue is forgiving. I would just eyeball amounts and get this thing thrown together.

I glanced at the screen of my laptop, balanced over on the other side of the kitchen out of the splatter zone, and noticed that all the ingredients seemed to be in 1- and 2-Tablespoon increments. Hoisin sauce went in. Oyster sauce? Didn't have any, so I added extra hoisin. No rice wine, either, so I used a splash of white wine. Then I opened the honey, and found it had solidified in the jar. No room or time to mess with melting it- I tossed in some brown sugar instead. Some ginger, some garlic... now that 5-spice powder I just bought, where did it go? I tossed in a generous capful, stirred it up, and plopped in the sliced-up pork. I clapped the lid on the slow-cooker, turned it to "low" and headed out to join my guests in the pool.

By bedtime, it was smelling rather licorice-y and not much at all like the Chinese barbecue pork buns I've known and loved. I shrugged off my misgivings and went to bed. The next morning, my first waking thought was, "What is that awful smell??!!" Alas, it was coming from the kitchen. Alas, it was my pork. Alas, it was dreadful.

It turns out that all the ingredients went in 1-2 Tablespoon increments EXCEPT the 5-spice powder. I was only supposed to use 1/4 tsp of that. So I'd put in 12 times too much. And apparently there is a reason all the recipes said to oven-roast the pork, not slow-cook it. The anise (licorice-y) flavor of the 5-spice powder was intensified by the long moist cooking while other balancing flavors died away. Plus I had made ill-advised substitutions for several key ingredients. The result was irredeemable. I had to throw the whole potful of pork away and simmer some cinnamon on the stove for an hour to cover the stink. This may be my most inedible concoction ever, right up there with the bitter eggplant parmesan of 2008.

I will try again. I am determined to provide myself an uniterrupted supply of pork buns. But next time I'll use the actual ingredients and measurements in the recipe. Here's hoping.

Wednesday, June 22, 2011

Summertime Strawberry Sorbet (Pops)


Ah, Summer! Here in Maryland that means hiking, swimming, kayaking, chasing fireflies... and day after day of hot, sticky, humid weather that leaves you panting and sweat-soaked after just walking outside to get the mail. The antidote? Strawberry Sorbet Pops. You can make this recipe in your ice-cream maker and get actual sorbet, but I forgot to put the cold part of my machine in the freezer, so my girlfriends and I made pops instead. I think I like the pops better. What's that you say? You don't have retro-fabulous Tupperware Popsicle molds? Keep your eyes peeled at yard sales and thrift stores- they show up often. In the meantime just mold your pops in Dixie Cups with popsicle sticks or straws. Put a little foil over the top and poke your stick through, to hold it up until the sorbet freezes.

Ingredients:
1 lb fresh strawberries
3/4 C Sugar (yes, you really need that much. trust me!)
1 Tbsp lemon juice
1tsp real vanilla extract

Directions:
Rinse the strawberries, remove the stems, and slice them up into a big bowl. Add the sugar, lemon juice, and vanilla and allow to sit for at least an hour, no more than two, until the berries get all juicy and mushy. The fancy cooking word for this is "macerate," which is very fun to say. Then dump the whole mess into your blender or food processor and puree it. Pour the puree into popsicle molds and freeze. Or, churn it into sorbet according to your ice-cream maker's instructions (don't forget to freeze the cold part of your machine the night before, like I did). These pops are delicious, sweet & creamy-textured, perfect for Summer. Enjoy!

(This recipe is slightly adapted from The Perfect Scoop of Strawberry Sorbet on www.yumsugar.com. Mainly we took out the kirsch and added vanilla, increased the lemon juice, and made pops instead of churned sorbet.)